Author Archives: Jeannette Kremer

How to Add New Maintenance Operation – Milo FMS

This How To document describes how to add a new maintenance operation in the Milo Fleet Management System. A maintenance operation is a maintenance task, such as, oil change, brake job, air filter change, etc. You can add as many maintenance operations as you want. A maintenance reminder can be setup for any maintenance operation.

Please follow the steps below to add a new maintenance operation.

Note: Click on screen shots to enlarge.

1. From the Dashboard…Click Tools/Settings tab.

Dashboard

2. In Client Tools, click Create and Manage Maintenance Item.

Client Tools

This opens the Manage Maintenance Operation window.

3. In Manage Maintenance Operation, click Add New Maintenance Operation.

The Maintenance Item Editor box will open.

Maintenance Item Editor

4. Complete the form.

Maintenance Item Editor done

Click Save.

The item is now added to the list.

Item added

How to Setup a Report Subscription – Milo Fleet Management System

How to Setup a Report Subscription

Setup a report subscription to automatically receive a report by email. You can choose a daily, weekly, or monthly schedule. The report can be sent as a PDF, Excel, and other popular formats.

Follow the steps below to setup a report subscription.

Note: Click on screen shots to enlarge.

1. From the Dashboard…click Reports tab.

Reports Tab

2. Click My Reports

My Reports

3. Click on the category for the report you want to subscribe to.

Category selection

4. Click the Clock icon next to the report you want to subscribe to. The Report Subscription setup form should appear.

Geofencer with clock

5. Complete the form.

Enter email address into the Email To text box.

Enter an email subject into the Email Subject text box.

Select a language from the Report Language dropdown menu (Default is English).

Select a format from the Report File Format dropdown menu (Default is PDF).

Select a send time from the Report Send Time calendar (Default is midnight).

Select the report frequency from the Report Frequency dropdown menu (Default is Monthly).

Completed Form

6. Click Save. You will now go back to the My Reports screen.

My Reports

How to Confirm Subscription Settings

1. Click on My Reports

My Reports

2. Click on the report category. You should see the subscription settings underneath the report name.

Confirm sub

How to Setup a Mileage by State Report Template – Milo Fleet Management System

The Mileage By State report displays the miles driven in each state by vehicle. Follow the steps below setup a Mileage by State report template.

1. Open a browser and login to your Milo account.

Milo login

2. From the Dashboard…Click Reports tab.

Dashboard

3. Click Fleet Reports (fourth report down).

Fleets Report

4. Click Mileage By State

Note: Mileage By State is second to the bottom.

Choose Data columns that you would like in the report.
Click SHOW/HIDE button to show or remove column from the report.

Note: By default, all columns are visible in report.

Mileage by State

Click Next.

5. Choose the Date Range and the vehicles that you want in the report.

Set the “Date Range” by clicking the drop box, then choose “Group,” leave all other options the same.

Date Range

Click Next.

6. Choose Display Options.

DISPLAY: Include Grid is selected by default. To Include Chart, slide the button to the left.

Display Options

Click Next.

7. Complete Report

REPORT NAME Change name of report by typing a new name in the box.

Complete Report

All options remain the same.

Click Finish Report.

8, Once the template is created, return to My Reports and click Fleet Reports.

My Reports

Click the name of the report to view.

9. This is what the report template will look like. (“Test Report” is the name given for this instructional.)

Test Report

Next step will be How to Setup a Report Subscription.

How to Assign a Dispatch Route to a Vehicle

Assigning a dispatch route to a vehicle in the Milo FMS is easy to do. Please follow the steps below to send a message to the Garmin.

Requirements: Dispatch Center module
Milo Fleet Management System: tracking.EfficientFleets.com
How to Assign a Dispatch Route

1. Click on the Dispatch tab.

HowToAssignRouteToVehicle

2. Click on the Assignments tab.

HowToAssignRouteToVehicle2

3. Search for the vehicle that you want to assign a route too.

Click on the search button or type in the first few letters of the vehicle name in the text box.

HowToAssignRouteToVehicle3

4. Click on the vehicle name that you are looking for.

HowToAssignRouteToVehicle4

5. Click Assign a Route

HowToAssignRouteToVehicle5

6. Select the route from the Selected Route dropdown menu.

You can schedule a route for a future date. Click on the Start Date text box to choose the date. By default, the route is assigned immediately.

HowToAssignRouteToVehicle6

7. Click on Assign Route.

HowToAssignRouteToVehicle7

The route is now assigned to a vehicle. The route will be transmitted immediately to the Garmin in the vehicle if the start date (step 6) is today’s date. If it is a future date, then the route will be sent on that date.

How to Create a Route in the Milo Dispatch Center

Creating a route in the Milo FMS Dispatch center is easy to do.

Please follow the steps below to create a route. To use the Dispatch center you must have the Dispatch module enabled.

Milo Fleet Management System: tracking.EfficientFleets.com

How to Create a Dispatch Route

1. Click on the Dispatch tab.

CreateRouteInDispatch

2. Click on the Routes button.

CreateRouteInDispatch 2

3. Click on Add New Route.

CreateRouteInDispatch3

4. Enter a name for the route.

CreateRouteInDispatch4

5. Click on Add New Stop. Each route must have at least 2 stops.

3 Ways to add a stop:
*Existing POI (landmark)
*Existing Stop
*Address

CreateRouteInDispatch5

6. Click on Specify an Address. Enter the name and address for 1 stop.

CreateRouteInDispatch6

7. Click on the Map to Coordinates button. This places a marker on the map for the stop.

CreateRouteInDispatch7

8. Click Next.

CreateRouteInDispatch8

9. Complete the arrival and departure times for this stop. The information entered does not have to be exact. It designed to help you determine how efficient your fleet is operating.

Estimated Arrival Time to the Stop: select a time that the vehicle is supposed to arrive.

Day (based on estimated arrival): choose when the vehicle is supposed to leave. “On the same day” means the vehicle will be leaving the same day that it arrived. “On the next day” means that the vehicle will depart the day after it arrives.

Stop Buffer (ft): the buffer size to determine if vehicle has arrived at stop. You may need to adjust the buffer size if the vehicle cannot get close enough to the stop.

CreateRouteInDispatch9

10. Click Next.

CreateRouteInDispatch10

11. Click Add New Stop to add the 2nd stop. Follow steps 4 – 10 to create the next stop.

CreateRouteInDispatch11

12. Click the Create Route button to finish the route.

CreateRouteInDispatch12

MILO FLEET MANAGEMENT SYSTEM RELEASE NOTES — RELEASE DATE: NOVEMBER 2014

Enhancement: New Filter to the Reports Date

Benefit to Users:

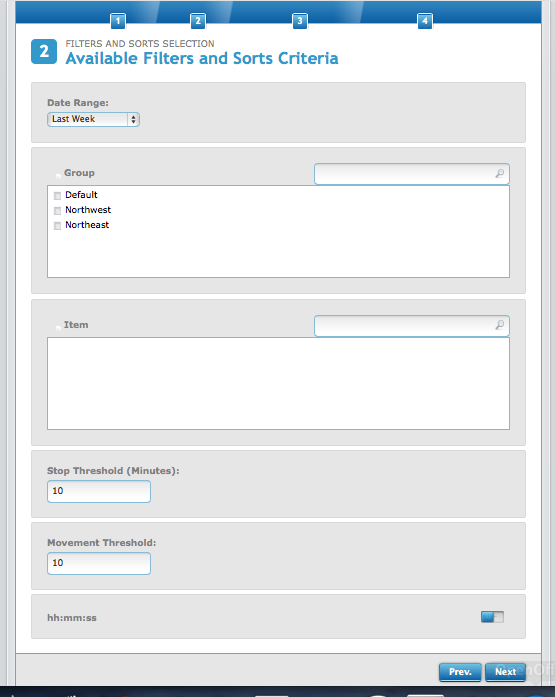
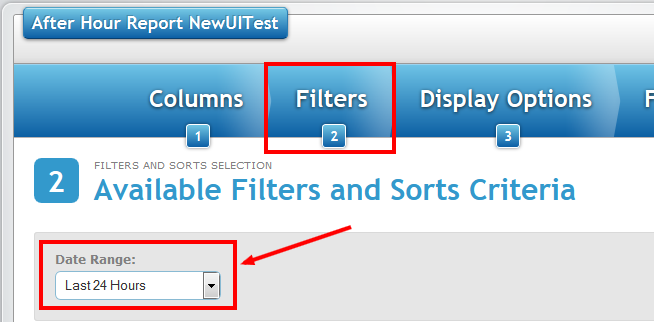
This New Filter, available on All Reports, provides the User with the ability to base the Date Range of a Report on the ‘Last 24 Hours.’ This Feature will be available for All Current Reports and all New Reports going forward. Prior to this Release, this filter was not available within any of the Reports.

Highlight:

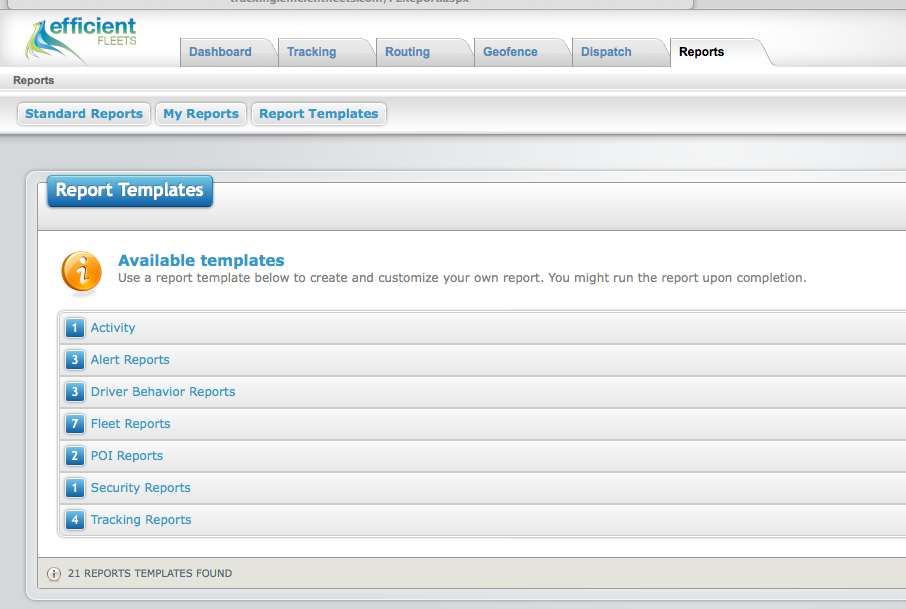
While configuring a Report, within the Available Filters, Users will now have the ability to select a Date Range of the ‘Last 24 Hours.’ By providing this Date Range Filter, Users will be able to continually run a Report on the Last 24 Hours of Reporting. As this is a ‘floating’ date range, My Reports and Report Subscriptions can also take advantage of this Date Range Filter. Users will be able to set this once and continually have the updated, Last 24 Hours of Information available in the Saved Report.

Milo Im 8

Enhancement: Sendum Device Integration Enhancement

Benefit to Users:

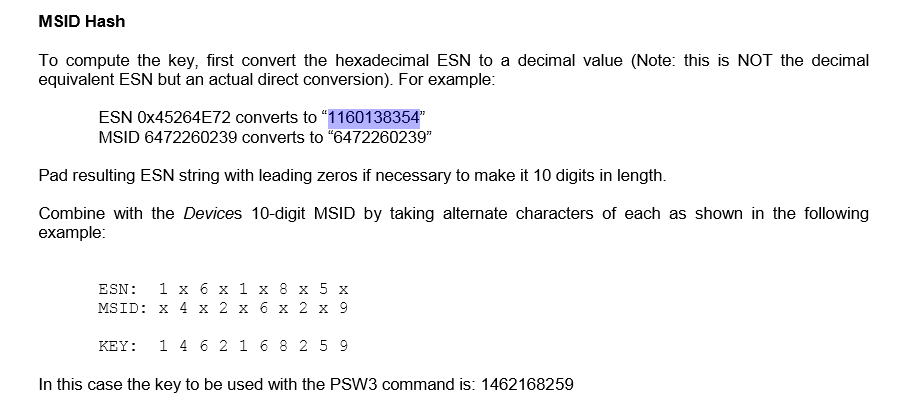
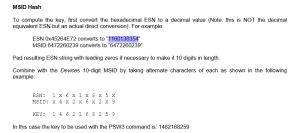
This Enhancement to the Sendum Device Integration includes the calculation of the Sendum Key within the Position Logic Platform. Prior to this Release, the calculation of the Sendum Key was not a calculation that was available within the Position Logic Platform.

Highlight:

This Enhancement will enable Users to quickly & accurately generate the Sendum Key within the Position Logic Platform. Users will simply login and Edit a Sendum Vehicle, on the selected Client. From the Edit Screen, the User will click ‘Save’ and the Sendum key will be generated, based on the following logic:

*Contact your Support Technician if you are currently using Sendum Devices, to ensure this Key is generated for all of your Sendum Devices.*

Milo Im 11

Enhancement: POI Buffer Visibility

Benefit to Users:

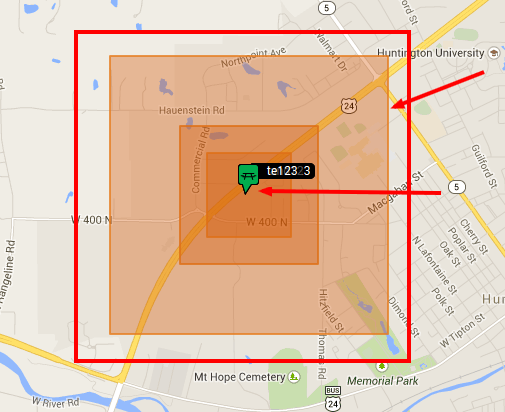
This Enhancement to the POI Buffer within the Platform, provides the User with instant visibility into not on the POI Name and Icon but, also the Buffer that is associated with the POI. Users will now very easily be able to identify the core of the POI along with the entire Buffer that is associated with the POI. Prior to this Release, the User had no visibility on the actual POI Buffer while viewing the POI within the Tracking Map.

Highlight:

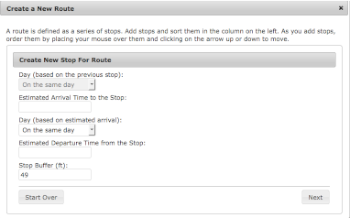
While viewing the POIs on the Tracking Map, Users will now be shown the actual Buffer of the POI. By simply selecting to ‘show’ the POIs, Users will find that the POI Buffer that has been setup, is now visible as a colored area around the POI. While this is a simple Enhancement, the overall User experience will be greatly increased thanks to this.

Milo Im 12

Bug Fix: User Geofence Import, Missing Tools
Issue:
A number of non-Admin Users with the Security Resource of GEOFENCE_IMPORT, were missing the Import Tools options for ‘Import Geofence from KML’ and ‘Import Geofence from Excel’ within Tools & Settings.

Solution: The Security Resource of GEOFENCE_IMPORT has been corrected to ensure that these two Import Geofence Options are now available within Tools & Settings. Any Users, with the Security Resource enabled, will now be able to see these Import choices. No further updates are needed by any Users experiencing this issue.

Milo Fleet Management System Release Notes — Release Date: October 2014

Milo Fleet Management System Release Notes — Release Date: October 2014
New Report: Queclink GV-500 OBD Report
Benefit to Users:

This New Report provides the Queclink GV-500 OBD Data in an easy to view & use Report Format. This Report will only work with the Queclink GV-500 Device, which provides OBD Data. Prior to this Release, this information was available within the Platform but, not available within any of the Reports.

Highlight:

Any Users tracking with the Queclink GV-500 OBD Device, will be able to take advantage of this Graphical Report. Within the formatting of this Report, Users have the ability to select to View a number of Data Columns including VIN, Diagnostic Codes and Fuel Consumption. By providing this Report, Users are now able to truly utilize all OBD Information sent via the Queclink GV-500 Device. In addition, this will enable the Users to Graph a variety of this OBD Data.

Milo Im 7 10-27-14

Milo Im 8 10-27-14

Enhancement: View Battery Level in Monitoring Center
Benefit to Users:

This Enhancement to the Monitoring Center Platform, will enable Users to view the Battery Level reported by Devices. Any Devices reporting Battery Level will display in the Track Page of the Monitoring Center Platform. Prior to this Release, this information was not displayed in the Track Page of the Monitoring Center Platform.

Highlight:

Once logged into the Monitoring Center Platform, and within the Track Page, Users will be able to view the Battery Information along with the additional information reported from the Device. This will be a default setting for any Devices that are currently reporting Battery. Adding this to the Monitoring Center was truly essential as this information is essential for any & all Device monitoring.

Milo Im 9 10-27-14

Update: Add Notes to Unit in Monitoring Center
Benefit to Users:

This Update to the Item, within the Monitoring Center, will enable the User to quickly add Notes. These Notes are associated with the individual Items – or the Group in which the Item belongs to – in the Monitoring Center. Prior to this Release, the ability to add Notes to Items was only available on the full Platform and not within the Monitoring Center.

Highlight:

Users can now add Notes to the Items within the Track Page of the Monitoring Center. The Note can be added to either the Individual Item or to the entire Group in which the Item belongs. This will enable not just the current User to view the Note but, also any other Users with access to the Item. This is essential for Monitoring Centers with multiple Users, reporting in for multiple shifts.

To add a Note, simply follow these steps:

Login to the Monitoring Center Platform
Select the ‘Track’ Page
Select the Information Pop-Up for the Item in which you wish to add the Note for
Select the ‘Notes’ tab from the Pop-Up
Select the ‘Add Note’ option
Select the ‘Assign to’ and input the Subject & Body of the Note
Select the ‘Save’ Button

Milo Im 10  10-27-14

Milo Fleet Management System Release Notes – September 2014

Milo Fleet Management System Release Notes — Release Date: September 2014
Enhancement: Supporting Temperature 3 & 4

Benefit to Users:

This Enhancement is to Support Temperature Values 3 & 4 sent from your Device. The Device would need to be integrated to take advantage of this Enhancement. Prior to this Release, you were only able to see up to 2 Temperature Values. By providing this Enhancement, Users are now able to closely monitor multiple Temperatures in Various Locations of the Platform.

Highlight:

Users will now be able to visualize the Temperature Values 3 & 4 with Gauges on the Informational Pop-Up, In the Item Label Configuration and Item Hover Configuration. Simply follow these steps to visualize the information throughout the Platform:

Login as Site Admin
Select the Sensors tab
Select the Number of Temperature Sensors in use
Provide a Low and High Value (optional)
Login to a Client
Select Tools and Settings
Select Manage General Settings
Select the Map Options Tab
Select Yes to Display Temperature
Choose if you would like to see it in the Item Label and/or Item Hover

Milo Image 1 10-27-14

Milo Im 2 20-27-14

Milo Im 3 10-27-14

Milo Im 4 10-27-14

Enhancement: Ethanol added to Fuel Type Options
Benefit to Users:

While this field is for informational purposes only, the goal is to have everything documented & located in one place. Providing the option to configure a variety of fuel options, enables the user to make additions as the fuel consumption/monitoring technology becomes available.

Milo Im 5 10-27-14

Bug Fix: Export KML Feature was Displaying Site Domain instead of Sub Domain Clients
Issue:

When a Sub-Client under their own account exported data to KML, we displayed the main domain instead of the sub-domain. This did not allow our client to fully white label their Platform. This issue was only occurring for a limited amount of Users however, this is now working as expected for everyone.

Solution:

Sub-Clients are now able to export KML without having their Service Providers main domain display for the End Users. This has been corrected for all Platforms to ensure that all users, will receive the comfort of a complete white label solution.

Milo Im 6 10-27-14

Assign Driver to Vehicle

Assign Driver to Vehicle

In this lesson we are going to assign the driver you created in the previous lesson. Assigning a driver to a vehicle allows you to determine which person was responsible for a particular action. This is very useful when more than one driver operates a vehicle.

1. Click Vehicle.
2. Click the pencil next to the vehicle you created earlier.
3. Click the Driver tab.
4. Click Assign Driver.
5. Click Search.
6. A list of all drivers will be returned.
7. Click on the one you created previous lesson.
8. Click Assign.
9. Click Save.
10. Click on Group Name at the top of the screen.
11. Click on Vehicle
12. Verify that the driver has been assigned to the vehicle.

Tip: When searching for a driver, you can type part of the name to get a list of drivers. This is very handy when you don’t know how to spell someone’s name.

Add New Driver

Add New Driver

In this lesson we are going to add a driver to the system.

1. From the dashboard, click on Driver under the Group you created earlier.
2. Click Add New.
3. Enter First Name.
4. Enter Last Name.
5. Take a look at the other data tabs: License/Insurance, Contact Information, and Vehicle History.
6. You can enter more information if you wish.
7. Click on the Save button.